Table of Contents
- What is Django REST framework?
- Why should you use Django REST framework?
- Why shouldn’t you use Django REST framework
- Alternatives to Django REST framework
- Getting Started
- Django views and class based views
- Serialization
- Authentication and authorization
- Backend filtering
- Pagination, caching, throttling, versioning and documentation
- Final thoughts
What is Django REST framework?
Django REST framework is the de facto library for building REST APIs in Django. It’s been around since 2011, and in that time has been used in thousands of projects with over a thousand contributors. It’s currently used by many large companies, including Robindhood, Mozilla, Red Hat, and Eventbrite.
Why should you use Django REST framework?
If you are using Django as your web framework and you need to write a REST API, the Django REST framework is the default choice to get the job done. It’s by far the most popular Django library for writing REST APIs, it’s well maintained and supported. It also comes with many features out of the box to simplify API development:
- A web browsable API – where you can browse and interact with your API
- Built in authentication and authorization, including packages for OAuth1a and OAuth2
- Built in serialization for Django models and other data, with input validation
- Easy backend filtering and sorting of data
- Support for throttling of requests
- Support for easy pagination of results
- Support for versioning
- Support for API schemas and documentation
- Lots of documentation and support of a large community
Why shouldn’t you use Django REST framework?
If you are using Django and REST APIs, it’s a no-brainer, you should use Django REST framework. But over the past few years another API type started gaining a lot of traction – GraphQL. If you are going to be writing a GraphQL API, it doesn’t make sense to use the Django REST framework, you should take a look at Graphene Django instead.
Alternatives to Django REST framework
Django REST framework has pretty much come to dominate Django REST API, but here are some other alternatives:
It looks like another complete Django REST API library. People that have used it seem to say lots of positive things about it. Unfortunately, the project stopped being maintained, and is not under active development anymore.
From the creator of Django Tastypie, this is a small, flexible REST API library. Where Django REST framework has evolved to be a big library that can accommodate pretty much everyone, Django Restless just tries to do a few things really well, without adding any bloat. If you like to tinker more and want something really fast and flexible, this might be the library for you.
Getting Started
Installation
To start using the Django REST Framework you need to install the djangorestframework package:
pip install djangorestframeworkAdd rest_framework to INSTALLED_APPS settings
INSTALLED_APPS = [
    ...
    'rest_framework',
]
That should be enough to get you started
Basic Example – Model CRUD API
Django REST framework makes it very easy to create a basic API that works with Django models. With a few lines of code we can create an API that can list our objects and do basic CRUD. Let’s take a look at an example with some basic models.
models.py
class Author(models.Model):
   name = models.CharField(max_length=255)

class Book(models.Model):
   author = models.ForeignKey(Author, on_delete=models.CASCADE)
   title = models.CharField(max_length=255)
Serializers allow the conversion of querysets and model instances into data types that can be rendered as Content Type (JSON, XML, etc) and the other way around.
serializers.py
class BookSerializer(serializers.ModelSerializer):
   class Meta:
       model = Book
       fields = ['author', 'title', 'num_pages']
views.py
from rest_framework import viewsets

from book.models import Book
from book.serializers import BookSerializer

class BookViewset(viewsets.ModelViewSet):
   queryset = Book.objects.all()
   serializer_class = BookSerializer
And we let the REST framework wire up the url routes based on common conventions.
urls.py
router = routers.DefaultRouter()
router.register(r'', views.BookViewset)

urlpatterns = [
   path('', include(router.urls)),
]
Going to http://127.0.0.1:8000/book gives us:

Here we can see a list of books with a GET request and can create a new book with a POST request. The Browsable API gives us a nice human browsable display and forms that we can play around with.
If we go to http://127.0.0.1:8000/book/1/, we see that a GET request to this url will give us details about the book with ID 1. A PUT request will modify that book’s data. And a DELETE request will delete the book with ID `1`.
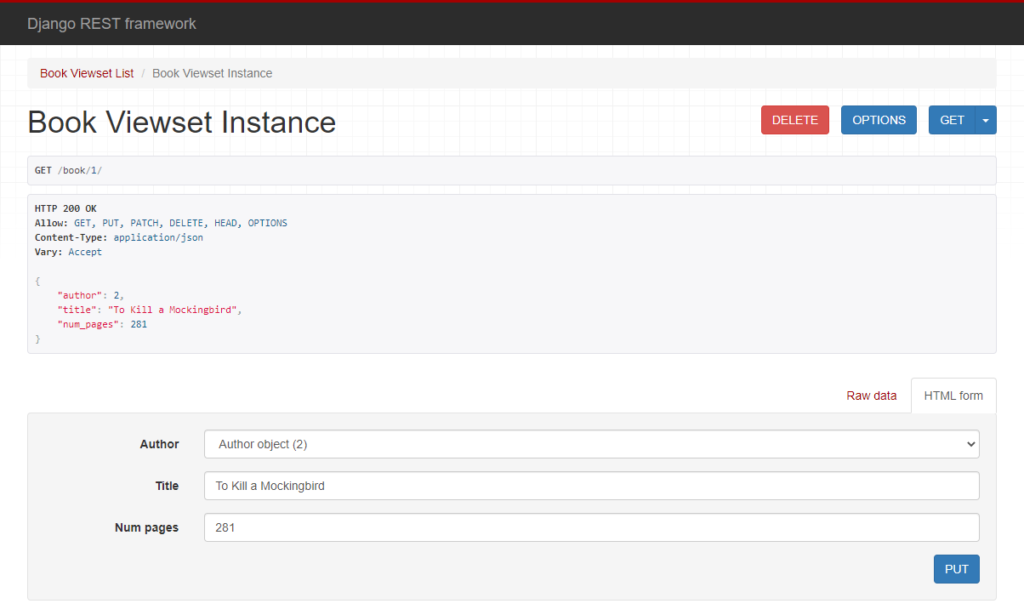
Since we are requesting Content-Type text/html we are receiving the Browsable API, human friendly template. If we were to ask for Content-Type application/json we would just be getting the JSON. You can also set the format explicitly in your browser like so:
http://127.0.0.1:8000/book/1/?format=json
Response:
{"author":2,"title":"To Kill a Mockingbird","num_pages":281}As you can see Django REST framework makes it very easy for us to create a basic model CRUD API.
Django views and class based views
As we saw in the basic example, Django REST framework makes model CRUD really simple. How do we go about writing some custom API calls? Let’s say we wanted to search the books from the basic example by author and title.
Here’s a basic Django view method for searching books:
views.py
@api_view(['GET'])
def book_search(request):
   author = request.query_params.get('author', None)
   title = request.query_params.get('title', None)

   queryset = Book.objects.all()
   if author:
       queryset = queryset.filter(author__name__contains=author)
   if title:
       queryset = queryset.filter(title__contains=title)

   serializer = BookSerializer(queryset, many=True)
   return Response(serializer.data)
urls.py
urlpatterns = [
   path('book-search', views.book_search, name='book_search'),
]
The code overall looks pretty similar to the standard Django view, with just a few modifications. It’s wrapped in the api_view decorator. This decorator passes a REST framework Request object and modifies the context of the returned REST framework Response object. We are using request.query_params instead of request.GET, and would use request.data instead of request.POST. And finally it uses a serializer to return a response, which will return the right content type to the client.
If we wanted to use class based views to facilitate code reuse we could modify the above code like so:
views.py
class BookSearch(APIView):

   def get(self, request, format=None):
       author = self.request.query_params.get('author', None)
       title = self.request.query_params.get('title', None)

       queryset = Book.objects.all()
       if author:
           queryset = queryset.filter(author__name__contains=author)
       if title:
           queryset = queryset.filter(title__contains=title)

       serializer = BookSerializer(queryset, many=True)
       return Response(serializer.data)
urls.py
urlpatterns = [
   path('book-search-view', views.BookSearch.as_view()),
]
Of course the REST framework has a bunch of reusable view classes and mixins you can use. For example, for the above example you might want to use ListAPIView. If you wanted to customize the Book CRUD code, instead of using the ViewSet from the basic example, you might want to combine a variation of ListModelMixin, CreateModelMixin, RetrieveModelMixin, UpdateModelMixin, and DestroyModelMixin.
GenericAPIView is a common view that adds some common functionality and behavior to the base REST framework APIView class. With this class you can override some attributes to get the desired behavior:
querysetor overrideget_queryset()to specify the objects that should come back from the viewserializer_classor overrideget_serializer_class()to get the serializer class to use for the objectpagination_classto specify how pagination will be usedfilter_backends– backends to use to filter the request, we go over backend filtering below
Here we use ListAPIView (which extends GenericAPIView and ListModelMixin) to create our book search:
views.py
class BookSearch(ListAPIView):

    serializer_class = BookSerializer

    def get_queryset(self):
        author = self.request.query_params.get('author', None)
        title = self.request.query_params.get('title', None)
        queryset = Book.objects.all()
        if author:
            queryset = queryset.filter(author__name__contains=author)
        if title:
            queryset = queryset.filter(title__contains=title)

        return queryset
Object update example
Let’s say that we had to write an API where we had to have someone update the status of a book’s read state:
model.py
class UserBook(models.Model):
   STATUS_UNREAD = 'u'
   STATUS_READ = 'r'
   STATUS_CHOICES = [
       (STATUS_UNREAD, 'unread'),
       (STATUS_READ, 'read'),
   ]

   book = models.ForeignKey(Book, on_delete=models.CASCADE)
   user = models.ForeignKey(get_user_model(), on_delete=models.CASCADE)
   state = models.CharField(max_length=1, choices=STATUS_CHOICES, default=STATUS_UNREAD)
serializers.py
class UserBookSerializer(serializers.ModelSerializer):
   class Meta:
       model = UserBook
       fields = ['book', 'user', 'status']
We want to limit the field that they can change to just the status. Ideally, we would validate that the user has permission to change this specific book, but we’ll get to that in the authentication/authorization section.
views.py
class BookStatusUpdate(UpdateAPIView):
   queryset = UserBook.objects.all()
   serializer_class = UserBookSerializer
   permission_classes = (permissions.IsAuthenticated,)

   def update(self, request, *args, **kwargs):
       instance = self.get_object()
       data = {'status': request.data.get('status')}
       serializer = self.get_serializer(instance, data, partial=True)
       serializer.is_valid(raise_exception=True)
       self.perform_update(serializer)

       return Response(serializer.data)
Serialization
So far we used very simple, automatic serialization by just listing the fields. REST Framework serializers are similar to Django Forms and give us a lot of control by specifying attributes and overriding various methods.
For our BookSerializers we could have listed out the fields with type, requirement, max_length, etc.
serializers.py
class BookSerializer(serializers.ModelSerializer):
   title = serializers.CharField(required=True, max_length=100)
   num_pages = serializers.IntegerField(read_only=True)

   class Meta:
       model = Book
       fields = ['author', 'title', 'num_pages']
We could also override create() and update() methods to be able to execute some custom functionality:
serializers.py
class BookSerializer(serializers.ModelSerializer):
   title = serializers.CharField(required=True, allow_blank=True, max_length=100)
   num_pages = serializers.IntegerField(read_only=True)

   def create(self, validated_data):

       # Custom code

       return Book.objects.create(**validated_data)

   def update(self, instance, validated_data):

       # Custom Code

       instance.title = validated_data.get('title', instance.title)
       instance.code = validated_data.get('num_pages', instance.code)
       instance.save()
       return instance


   class Meta:
       model = Book
       fields = ['author', 'title', 'num_pages']
Working with serializers is very similar to how we work with Django forms, we validate the serializer and then call save(), saving the instance. Here’s a serializer that validates the title of the book.
serializers.py
class BookSerializer(serializers.ModelSerializer):
   title = serializers.CharField(max_length=100)

   def validate_title(self, value):
       if len(value) < 4:
           raise serializers.ValidationError("Title is too short")

       return value

   class Meta:
       model = Book
       fields = ['author', 'title', 'num_pages']
views.py
serializer = BookSerializer(data=data)
if serializer.is_valid():
	serializer.save()
Referencing other models
You can reference other entities in various ways:
- Using the primary key:
PrimaryKeyRelatedField - Using hyperlinking (the api endpoint url for the other entity):
HyperlinkedRelatedField - Using the string representation of the object:
StringRelatedField - Using an identifying slug field on the related entity:
SlugRelatedField - Nesting the related entity inside the parent representation: We’ll discuss that more below
For example, here’s how an Author on our Book might look if we were to just use PrimaryKeyRelatedField
{
    "author": 2,
    "title": "To Kill a Mockingbird",
    "num_pages": 281
}
Nested serializers
Serializers can be nested, this way we can work on multiple objects in one operation, like getting all the information about the Book as well as the Author in a GET request:
serializers.py
class AuthorSerializer(serializers.ModelSerializer):
   name = serializers.CharField(max_length=255)

   class Meta:
       model = Author
       fields = ['name']

class BookSerializer(serializers.ModelSerializer):
   title = serializers.CharField(max_length=255)
   author = AuthorSerializer()

   class Meta:
       model = Book
       fields = ['author', 'title', 'num_pages']
http://127.0.0.1:8000/book/1/ returns
{
    "author": {
        "name": "Harper Lee"
    },
    "title": "To Kill a Mockingbird",
    "num_pages": 281
}
To be able to create and update a nested relationship in one request you will need to modify create() and update(), they will not work with nested fields out of the box. The reason for this is that the relationship between models is complicated and based on specific application requirements. It’s not something that can be set up automatically; your logic will have to deal with deletions, None objects, and so on.
Here’s how you might handle create() in our simple example:
serializers.py
class BookSerializer(serializers.ModelSerializer):
   title = serializers.CharField(max_length=255)
   author = AuthorSerializer()

   def create(self, validated_data):
       author_data = validated_data.pop('author')
       author = Author.objects.create(**author_data)
       book = Book.objects.create(author=author, **validated_data)
       return book


   class Meta:
       model = Book
       fields = ['author', 'title', 'num_pages']
Doing a POST to http://127.0.0.1:8000/book with
{
    "author": {
        "name": "John1"
    },
    "title": "Book by John1",
    "num_pages": 10
}
Will now create both an author and a book.
Here’s how we might handle a simple update()
serializers.py
def update(self, instance, validated_data):
   author_data = validated_data.pop('author')
   author = instance.author

   instance.title = validated_data.get('title', instance.title)
   instance.num_pages = validated_data.get('num_pages', instance.num_pages)
   instance.save()

   author.name = author_data.get('name', author.name)
   author.save()

   return instance
A PATCH or PUT call to http://127.0.0.1:8000/book/8/ (that’s the id of this particular book), with
{
    "author": {
        "name": "John1_mod"
    },
    "title": "Book by John1_mod",
    "num_pages": 20
}
Will modify our book with the new author, title, and num_pages.
Validation
Validation in the REST framework is done on the serializer. Just like with Django forms you can set some basic validation on the fields themselves. In our example above, we had:
serializers.py
class AuthorSerializer(serializers.ModelSerializer):

   class Meta:
       model = Author
       fields = ['name', 'email']
We can add individual fields with various requirements to enforce various rules:
serializers.py
class AuthorSerializer(serializers.ModelSerializer):
   name = serializers.CharField(max_length=255, required=True)
   email = serializers.EmailField(read_only=True,
                               validators=[UniqueValidator(queryset=Author.objects.all())])


   class Meta:
       model = Author
       fields = ['name', 'email']
Now name is required field, email is read only and unique.
Just like with forms, before saving a serializer, you should call is_valid() on it. If there are validation errors they will show up in serializer.errors as a dictionary.
serializer.errors
# {'email': ['Enter a valid e-mail address.'], 'created': ['This field is required.']}
When writing your serializer, you can do field level and object level validation. Field-level validation can be done like this:
class AuthorSerializer(serializers.ModelSerializer):

   def validate_email(self, value):
       if value.find('@mail.com') >= 0:
           raise serializers.ValidationError("The author can't have a mail.com address")
       return value

   class Meta:
       model = Author
       fields = ['name', 'email']
Object level validation can be done like this:
class AuthorSerializer(serializers.ModelSerializer):

   def validate(self, data):
       if data['email'].find(data['name']) >= 0:
           raise serializers.ValidationError("The author's email can't contain his name")

       return data

   class Meta:
       model = Author
       fields = ['name', 'email']
Authentication and authorization
Authentication
The default authentication scheme can be set globally with DEFAULT_AUTHENTICATION_CLASSES setting:
settings.py
REST_FRAMEWORK = {
    'DEFAULT_AUTHENTICATION_CLASSES': [
        'rest_framework.authentication.BasicAuthentication',
        'rest_framework.authentication.SessionAuthentication',
    ]
}
Or on a per view basis with authentication_classes:
views.py
class BookSearch(ListAPIView):
   queryset = Book.objects.all()
   serializer_class = BookSerializer
   authentication_classes = [SessionAuthentication, BasicAuthentication]
   permission_classes = [IsAuthenticated]


@api_view(['GET'])
@authentication_classes([SessionAuthentication, BasicAuthentication])
@permission_classes([IsAuthenticated])
def book_search(request):
	pass
There are four types of authentication schemes:
BasicAuthentication: Where the client sends the username and password in the request, not really suitable for production environmentsTokenAuthentication: When the client authenticates, receives a token, and that token is then used to authenticate the client. This is good for separate clients and serversSessionAuthentication: This is the standard django authentication scheme, where there is a server side session and the client passes the session id to the serverRemoteUserAuthentication: This scheme has the web server deal with authentication
For APIs, especially where the client is a separate application from the server, token authentication is the most interesting. To do token authentication with Django REST framework, you have to add rest_framework.authtoken to your INSTALLED_APPS.
settings.py
INSTALLED_APPS = [
    ...
    'rest_framework.authtoken'
]
Run migrations after adding this app.
In your application you will have to create a token for the user after they authenticate with a username and password, you can do it with this call:
views.py
token = Token.objects.create(user=...)And then pass that token back to the client. The client will then include that Token in the HTTP headers like so:
Authorization: Token 9944b09199c62bcf9418ad846dd0e4bbdfc6ee4bREST framework already has a built-in view for obtaining an auth token, obtain_auth_token. If the defaults work for you, you can wire this view in urls, and don’t have to write any of your own logic.
urls.py
from rest_framework.authtoken import views
urlpatterns += [
    path('api-token-auth/', views.obtain_auth_token)
]
Authorization
For authorization you can also set global and view level policies. For global you would set it in settings.py:
REST_FRAMEWORK = {
    'DEFAULT_PERMISSION_CLASSES': [
        'rest_framework.permissions.IsAuthenticated', # Allow only authenticated requests
        # 'rest_framework.permissions.AllowAny', # Allow anyone
    ]
}
And for views, you would use permission_classes:
views.py
class BookSearch(ListAPIView):
   queryset = Book.objects.all()
   serializer_class = BookSerializer
   authentication_classes = [SessionAuthentication, BasicAuthentication]
   permission_classes = [IsAuthenticated]


@api_view(['GET'])
@authentication_classes([SessionAuthentication, BasicAuthentication])
@permission_classes([IsAuthenticated])
def book_search(request):
	Pass
You can have a view that’s authenticated or read only like this:
permission_classes = [IsAuthenticated|ReadOnly]For a full list of permissions take a look at the API Reference
You can also create custom permissions by extending permissions.BasePermission:
class CustomPermission(permissions.BasePermission):
   def has_permission(self, request, view):
       ip_addr = request.META['REMOTE_ADDR']
       blocked = Blocklist.objects.filter(ip_addr=ip_addr).exists()
       return not blocked
And then include it in your permission_classes:
views.py
class BookSearch(ListAPIView):
   queryset = Book.objects.all()
   serializer_class = BookSerializer
   authentication_classes = [SessionAuthentication, BasicAuthentication]
   permission_classes = [CustomPermission]
And finally, Django REST framework supports object level permissioning by calling check_object_permissions, it will then determine if the user has permissions on the Model itself.
Backend filtering
Filtering
Most of the time you want to filter the queryset that comes back. If you are using GenericAPIView, the simplest way to do that is to override get_queryset(). One common requirement is to filter out the queryset by the current user, here is how you would do that:
views.py
class UserBookList(ListAPIView):
   serializer_class = UserBookSerializer

   def get_queryset(self):
       user = self.request.user
       return UserBook.objects.filter(user=user())
Our BookSearch above, actually used query parameters (query_param) to do the filtration by overriding get_queryset().
Generic filtering
Django REST framework also lets you configure a generic filtering system that will use fields on the models to determine what to filter.
To get that set up, you need to first install django-filter
pip install django-filterThen add django_filters to INSTALLED_APPS
INSTALLED_APPS = [
    ...
    'django_filters',
    ...
Then you can either add backend filters globally in your settings.py file
REST_FRAMEWORK = {
    'DEFAULT_FILTER_BACKENDS': ['django_filters.rest_framework.DjangoFilterBackend']
}
Or add it to individual class views
views.py
from django_filters.rest_framework import DjangoFilterBackend

class BookSearch(generics.ListAPIView):
    ...
    filter_backends = [DjangoFilterBackend]
Let’s modify our BookSearch example above with Django Backend Filtering. What we had above:
views.py
class BookSearch(APIView):

   def get(self, request, format=None):
       author = self.request.query_params.get('author', None)
       title = self.request.query_params.get('title', None)

       queryset = Book.objects.all()
       if author:
           queryset = queryset.filter(author__name__contains=author)
       if title:
           queryset = queryset.filter(title__contains=title)

       serializer = BookSerializer(queryset, many=True)
       return Response(serializer.data)
Let’s modify it to use Backend Filtering:
class BookSearch(ListAPIView):
   queryset = Book.objects.all()
   serializer_class = BookSerializer
   filter_backends = [DjangoFilterBackend]
   filterset_fields = ['author__name', 'title']
This gets us exact matches though, which isn’t exactly the same functionality. We can change it to SearchFilter filter to get us the same functionality as above:
class BookSearch(ListAPIView):
   queryset = Book.objects.all()
   serializer_class = BookSerializer
   filter_backends = [SearchFilter]
   filterset_fields = ['author__name', 'title']
Now we just call it with
http://127.0.0.1:8000/book/book-search-view?search=harper
And get back all the books that have “harper” in the title or author’s name.
Generic ordering
We can also order against specific fields like so:
views.py
class BookSearch(ListAPIView):
   queryset = Book.objects.all()
   serializer_class = BookSerializer
   filter_backends = [OrderingFilter]
   ordering_fields = ['title', 'author__name']
Letting someone order with a query like this:
http://127.0.0.1:8000/book/book-search-view?ordering=-title
Note, that if you don’t specify ordering_fields or set it to ‘__all__’ it will potentially expose fields that you don’t want someone to filter by, like passwords.
Pagination, caching, throttling, versioning and documentation
Pagination
Pagination can be set globally and per view level. To set it globally add it to the settings file:
settings.py
REST_FRAMEWORK = {
    'DEFAULT_PAGINATION_CLASS': 'rest_framework.pagination.LimitOffsetPagination',
    'PAGE_SIZE': 25
To set it on a view you can use the pagination_class attribute. You can create a custom pagination class by extending PageNumberPagination:
class StandardResultsSetPagination(PageNumberPagination):
    page_size = 100
    page_size_query_param = 'page_size'
    max_page_size = 1000
Caching
Caching is done by Django with method_decorator, cache_page and vary_on_cookie:
# Cache requested url for 2 hours
@method_decorator(cache_page(60*60*2), name='dispatch')
class BookSearch(ListAPIView):
   queryset = Book.objects.all()
   serializer_class = BookSerializer
   authentication_classes = [SessionAuthentication, BasicAuthentication]
   permission_classes = [CustomPermission]
vary_on_cookie can be used to cache the request for a user
Throttling
You can throttle (control the rate of requests) your API. To do it at a global state add these settings:
REST_FRAMEWORK = {
    'DEFAULT_THROTTLE_CLASSES': [
        'rest_framework.throttling.AnonRateThrottle',
        'rest_framework.throttling.UserRateThrottle'
    ],
    'DEFAULT_THROTTLE_RATES': {
        'anon': '100/day',
        'user': '1000/day'
    }
}
Or set it at the view level with throttle_classes, for example:
views.py
class BookSearch(ListAPIView):
   queryset = Book.objects.all()
   serializer_class = BookSerializer
   authentication_classes = [SessionAuthentication, BasicAuthentication]
   throttle_classes = [UserRateThrottle]
For throttling, clients are by default identified with the X-Forwarded-For HTTP header, and if not present then by the REMOTE_ADDR HTTP header.
Versioning
By default versioning is not enabled. You can set up versioning by adding this to your settings file:
REST_FRAMEWORK = {
    'DEFAULT_VERSIONING_CLASS': 'rest_framework.versioning.NamespaceVersioning'
}
If DEFAULT_VERSIONING_CLASS is None, which is the default, then request.version will be None.
It’s possible to set versioning on a specific view with versioning_class, but usually versioning is set globally.
You can control versioning with the following settings:
DEFAULT_VERSION: sets the version when no version is provided, defaults to None.default_versionattribute on the view.ALLOWED_VERSIONS: specifies the set of versions that are allowed, if not in the set it will raise an error.allowed_versionsattribute on the view.VERSION_PARAM: The parameter to use for versioning, defaults toversion.version_paramattribute on the view.
You have a few options for versioning classes:
AcceptHeaderVersioning: Version is passed in theAcceptheaderURLPathVersioning: Version is passed as part of the url structureNamespaceVersioning: Similar toURLPathVersioningbut uses url namespacing in Django. Take a look at how it differs fromURLPathVersioninghereHostNameVersioning: Uses the hostname url to determine the versionQueryParameterVersioning: Uses a query parameter to determine the version
You can also create your own custom versioning scheme
How you deal with different versions in your code is up to you. One possible example is to just use different serializers:
def get_serializer_class(self):
    if self.request.version == 'v1':
        return BookSerializerV1
    return BookSerializerV2
Documentation
To generate documentation for your API you will have to generate an OpenAPI Schema. You will install pyyaml and uritemplate packages.
pip install pyyaml uritemplateYou can dynamically generate a schema with get_schema_view(), like so:
urlpatterns = [
    # ...
    # Use the `get_schema_view()` helper to add a `SchemaView` to project URLs.
    #   * `title` and `description` parameters are passed to `SchemaGenerator`.
    #   * Provide view name for use with `reverse()`.
    path('openapi', get_schema_view(
        title="Your Project",
        description="API for all things …",
        version="1.0.0"
    ), name='openapi-schema'),
    # ...
Going to http://127.0.0.1:8000/openapi should show you the full OpenAPI schema of your API.
You can customize how your schema is generated, to learn how to do that, check out the official documentation
You can set descriptions on your views that will then be shown in both the browsable API and in the generated schema. The description uses markdown. For example:
@api_view(['GET'])
def book_search(request):
   """
   The book search
   """
   …
For viewset and view based classes you have to describe the methods and actions:
class BookViewset(viewsets.ModelViewSet):
   """
   retrieve:
   Return the given book

   create:
   Create a new book.
   """
   queryset = Book.objects.all()
   serializer_class = BookSerializer
Final thoughts
As we saw above, Django REST Framework is an incredibly complex and all encompassing REST API framework. I tried to distill some of the main concepts into this guide, so that you can start working with the framework. The reality is that there is still a lot that I wasn’t able to cover in this guide as far as the types of customizations you can make, the options you can set, and the various classes for every type of scenario. If you ever get stuck, you can always reference the API Guide at https://www.django-rest-framework.org/.